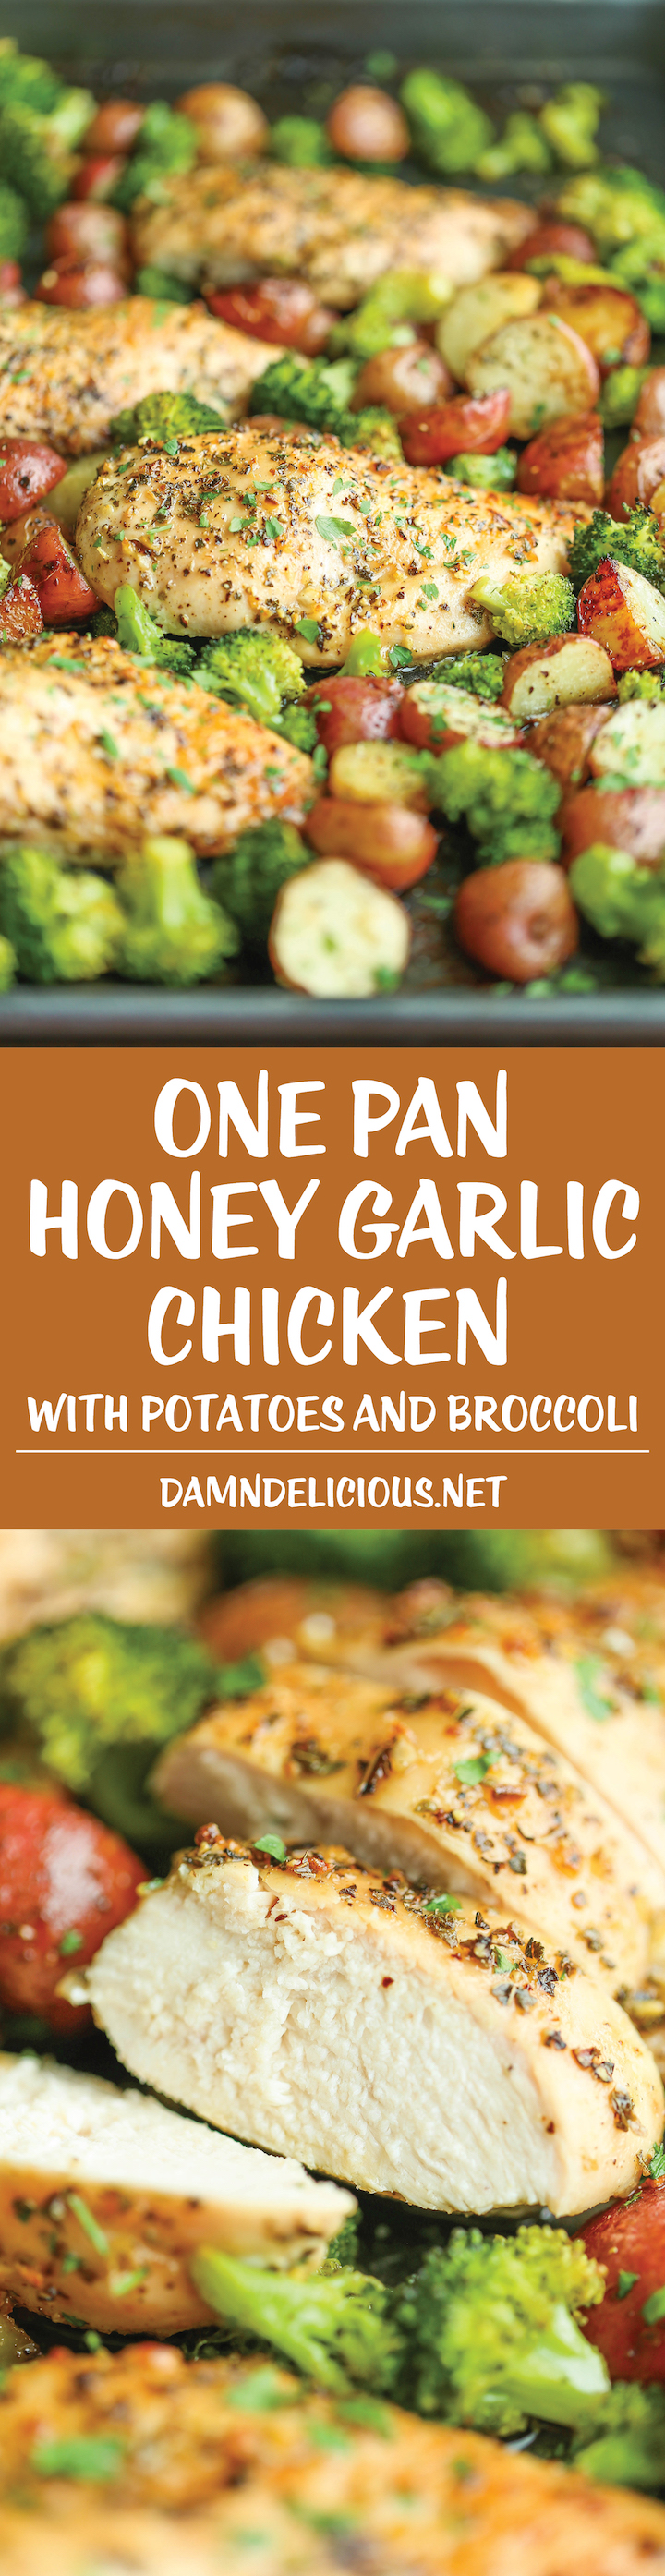
Tender, juicy chicken breasts baked to perfection with potatoes and broccoli. All cooked on a single pan! EASY!
With the many, many chicken thigh recipes I have been cooking lately, I’ve had quite a few requests for recipes using chicken breasts instead. Now I must admit that there’s nothing more juicier than a bone-in, skin-on chicken thigh but this honey garlic chicken breast does come to a close second.
It’s even better when you cook your veggies alongside that sweet and savory garlic sauce, letting the juices run loose as your vegetables get roasted to crisp-tender perfection. You can also add in more veggies to your liking but I highly recommend being conscientious of the cooking time depending on the vegetable.
Now this is truly a one pan meal, and if you really want to save on dishes, I recommend placing the baking sheet at the middle of table and eating straight out of the pan. There’s absolutely no shame in doing so. No shame at all.
Love chocolate and peanut butter? Then these No Bake Chocolate Peanut Butter Balls will become a favorite!
Is there a better combination than peanut butter and chocolate? No, there isn’t. Not even peanut butter and jelly, sorry for all you PB&J lovers out there.
Honestly though, if I was on my death bed, this would be one food that I would request. I am a lover of all things chocolate and peanut butter, but combine them? I am in HEAVEN.
I used to make these a lot and they would quickly disappear. Who me? NOoooo, it’s not me, it’s my inner fat girl that can’t control herself around these things.
I don’t even remember where the original recipe was from because I started making these years ago, but once I started Keto I forgot about them because the recipe called for honey.
If you have been following me for a bit you know that my mission is to make you see that anything can be Keto, just like cauliflower can be pizza!
The first time I tried to Keto-vert these (hey, I just made a word) I used erythritol as the sweetener.
Although they still turned out really tasty, I wasn’t too thrilled with how thick the dough was and the gritty texture from that particular sweetener. Not to mention, my husband is not a fan of erythritol. I can’t be the only one eating these so I had to think of a substitute.
Feel free to use any sweetener you do have. I would recommend you grind it in a Nutri bullet or grinder first though. Otherwise, if honey isn’t an issue for you, go ahead and use 1/4 cup honey instead.
Secondly, I added some coconut flour to make it easier to mix and roll the balls. Otherwise, they will just break in your hand and frustrate you.
Besides that, freeze them for at least 30 minutes if not longer before dipping them into the chocolate mixture. Otherwise, they will melt and make a giant mess.
For storage, I recommend you keep them in the freezer in an airtight container or freezer bag. They will last longer this way because you may forget about them in there.
Or, you can be brave and leave them in the fridge, test your self-control (I already know mine sucks when it comes to these). Just don’t leave them out for too long or they will melt.
Want to see the rest of my Keto Christmas Recipes? You can find them HERE.
This post contains an affiliate link in which if a purchase is made I receive a commission at no additional cost to you. Thank you for your support!
Instead of having a sign in book at the reception, Kambrie and Joel opted for business cards that guests could write advice to the happy couple.
I never made it to the table (sorry).
Before I go on I need to fill ya'll in. In my family when someone gets married my Aunt Kath makes them a quilt. Each family then makes a quilt square to go on the blanket. The squares are fun--some of pictures, others have funny anecdotes, and then there are those that have advice.
I opted for giving my lil' sis advice and this is what our quilt square said:
That's it. buahahaha.
Believe me I have tried to fight naked, and I have ended up having to put my clothes back on so I could actually get through the argument. TMI???
So here is my more serious advice to Kambrie (and I guess to anyone else that may be married/getting married)....
1. You are always going to wish you had a bigger house, more money, less stress, and more vacation time. Just remember to enjoy "now," because when it is over you'll wish you have savored those times.
2. There's no "how to guide to marriage." Sorry. We are all just wingin' it. What may work for me in my marriage may not work for you. However that is the joy of marriage--learning to grow together.
cuddles on the couch, best friend for life, hugs for no particular reason, someone to come home to, waking up in someone's arms. And it is also about toilet paper put in the wrong way, snoring, dirty dishes, clothes on the floor, and who gets the remote control.
I just keep coming up with more and more delicious brownies and these are truly some of the best brownies your ever going to make and taste. I really don't think, no I know that no one makes better brownies than these. These are some of the best brownies your ever going to taste in your life. So why are you waiting. Print off or write down the ingredients and get started to the store right now for these wonderful ingredients. So you can make the best brownies you'll ever eat in your life. Come on you know you want to.
Ingredients For Your Brownies: 1/2 cup butter
1 cup white sugar
2 eggs
1 teaspoon vanilla extract
1/3 cup unsweetened cocoa powder
1/2 cup all-purpose flour
1/4 teaspoon salt
1/4 teaspoon baking powder
3 tablespoons butter, softened
3 tablespoons unsweetened cocoa powder
1 tablespoon honey
1 teaspoon vanilla extract
1 cup confectioners' sugar
Instructions:
Preheat oven to 350 degrees F (175 degrees C). Grease and flour an 8 inch square pan.
In a large saucepan, melt 1/2 cup butter. Remove from heat, and stir in sugar, eggs, and 1 teaspoon vanilla.
Beat in 1/3 cup cocoa, 1/2 cup flour, salt, and baking powder. Spread batter into prepared pan.
Bake in preheated oven for 25 to 30 minutes. Do not overcook.
To Make Frosting: Combine 3 tablespoons butter, 3 tablespoons cocoa, 1 tablespoon honey, 1 teaspoon vanilla, and 1 cup confectioners' sugar. Frost brownies while they are still warm.
How To Make Delicious Homemade Peanut Butter Cups
If you love fudge and peanut butter then you just have to make these delicious homemade peanut butter cups. They are so damn delicious. One of the best things you'll ever eat.
Please do us a favor and post this post to Facebook, Pinterest, Twitter, And Etc. Thanks In Advance.
Tis the season for cold and flu! As wonderful and magical as winter time is, I could really do without the sniffles and other sickly symptoms that come along with it. For the past few days I've had what I assume is a severe cold. It started with a horrible sore throat, you know the kind. When you feel like you just swallowed a bucket of sand followed by some crushed glass. Sore throats are the worst. I tried drinking hot beverages and taking cough syrup and cough drops, all to no avail. So of course my next plan of action was to turn to Pinterest! (Who needs doctors when you have Pinterest?!) Of course when I searched "sore throat" I found about 31,268 home remedies for sore throats. I chose a homemade drink consisting of lemon juice, honey, apple cider vinegar and cinnamon. It sounded yummy and all of the ingredients have healing properties, so I figured it was worth a try. I modified the recipe a little from the original and ended up with a pretty tasty drink that worked WONDERS on my throat. Without further ado, I give you my Miracle Sore Throat Cure.
The original recipe I found called for 2 tablespoons lemon juice, 2 tablespoons honey, 2 tablespoons apple cider vinegar and a dash of cinnamon mixed with hot water. It didn't say how much water to use, so I decided instead of just hot water I would make a cup of my favorite tea and mix the ingredients with that. I used 2/3 cup hot water and a STASH Chai Spice Black Tea bag for the tea (but you can use any flavor you like). Once the tea was ready I stirred in all the ingredients, using 1 tablespoon of apple cider vinegar instead of 2. Just from the smell of the concoction I decided it probably wouldn't taste too great as it was, so I added a few spoonfuls of sugar. You can add how ever many you like, depending on how sweet you want it to be. Finally, I took the plunge and tried a sip. It was actually quite tasty and it warmed me up and soothed my throat immediately! I'm telling you people, by the time I finished the entire cup my sore throat was COMPLETELY GONE and IT DIDN'T COME BACK! It was amazing. I am absolutely in love with this drink and I will definitely be drinking it whenever I get sick. The best part is if you drink it a few times a day it will help shorten your cold because of the healing/antibacterial properties of the ingredients. So next time you get sick, give this awesome drink a try and let me know how it works for you! xoxo, Jessica.
Miracle Sore Throat Cure:
2/3 cup hot water (for tea)
1 tea bag (Any flavor you like. I used STASH Chai Spice Black Tea.)
2 tbsp lemon juice
2 tbsp honey
1 tbsp apple cider vinegar
dash of cinnamon
sugar to taste
Brew your tea, then stir in the rest of the ingredients. Drink up and be amazed/relieved when your sore throat disappears! Drink 2-5 times daily to help shorten a cold.
When we named our middle daughter Melissa, we didn't really know what it meant. We just liked how it sounded. Later, however, we found out that Melissa is a Greek name, meaning honey bee. (Alternatively, it means red rose in Persian). Melissa is the feminine version of the name of a legendary King of Crete, Melisseus. In Greek myth, Melissa is also the name of a princess of Crete who was turned into a honey bee after learning how to collect honey.
So perhaps it is not surprising that Mel had a slight bumble bee collecting fetish when she was younger. The first bee related thing I made her was the Melissa jumper partially pictured above complete with hand embroidered bees. (I like the little bee instead of a dot on the 'i'). (Even though this little jumper hasn't fitted Melissa in about 10 years, it is still carefully stored in the precious potential knitted heirloom box. One day, I might turn it into a cushion).
I wanted to make something three dimensional though, a little knitted or crocheted bumble bee type creature. So I went hunting for inspiration...
This is Bazill the Buzzing Bumble Bee - free pattern here
Hello Kitty in a bee suit complete with bugs and butterflies. Mel is also a Hello Kitty fan.
Alexa - an Amigurumi Bee Girl - pattern by Mia Zamora Johnson. Pattern available from the Ravelry Pattern store, Mia's Etsy shop or visit Mia's blog Owlishly
So I eventually decided it was going to be something in a bee suit. So here is a Bear in a Bee Suit. The basic bear body comes from a pattern from Debbie Bliss. (In fact, it is the same basic bear as the ballerina bear from last post). The head, arms, legs and ears are knitted using an eight-ply acrylic multi-dyed yarn on 2.75 mm needles. The body is knitted in stripes of yellow and black. I designed the hood so that it can be pulled up over the teddy's ears or left loose. It is only attached at the neck edge. The antenna are made from tightly rolled knitted strips with tiny knitted woolen balls at their tips. The bears body is fully movable with jointed arms and legs.
For his photo shoot, the bear decided to pose in my garden with the emerging spring bulbs.
1. Inspired with the modern decor, Marriott wooden 3 seater sofa has all the qualities of the same. This sofa has indented box at the sides that add to the aesthetics of the furniture.
2. This sofa is made in sheesham wood and is further coated in wooden grain shade.
3. It is available in three finish options of honey, teak and walnut finish.
Keep calm. Football and tailgating season is here!
Now that I have your attention…
We are a nation of football enthusiast who live for this time of year when fans gather together with the common interests of good times, good eats and victorious scores.
PTO days have been building, work schedules cleared, weekend honey-do-list put on after football season hold, supplies gathered, parking passes purchased, hotel rooms, campground sites and flights booked, menus planned, grills and smokers cleaned, the ESPN college football app downloaded.
Now comes tailgating time.
Proper tailgating takes time to plan, and everyone has a method to their tailgating madness.
Marilyn K. Creations
Fall means football and tailgating in the South as well as the North, East, and West!
We are geared up and good to geaux for Louisiana Saturday night tailgating season.
LSU Locker Room Glory Artwork
Saturday kicks off this year’s college football and tailgating season.
Tailgating is the good times and good food pass a good time prelude to the game.
A good tailgate is defined in different ways, but festive camaraderie is the common ground game goal of all.
Tablescapes impress, menus rival five star restaurants, and the drink flows like the Mississippi River.
A hot chocolate bar is a big hit on cool fall game day afternoons and evenings.
I buy a commercial size box of instant hot chocolate packets and prepare as directed in enamel camping mugs.
Set up the “bar” with small galvanized buckets or the plastic metallic buckets from the dollar store lined with bandannas in home team or fall colors make super cute holders for marshmallows, chocolate chips, cinnamon and peppermint sticks.
For the over 21 crowd, spike the hot chocolate flavor into the Southern Comfort zone.
Tailgating Trivia:
Plaquemines Parish, Louisiana is the home to Woodland Plantation, the mansion depicted in the 1871 lithograph, A Home on the Mississippi.
Post prohibition, the lithograph was licensed for use on, you guessed it, the label of Southern Comfort.
Tailgating Tunes Gotta Have It List
Tablescape ideas, menu suggestions and recipes run the field of creativity.
The recipes in this tailgating post give a spirited and seasoned shout out to Louisiana.
LSU Spiked Blueberry Lemonade Recipe
Ingredients
2 oz. vodka
1 handful blueberries
1 pinch sugar
12 oz. lemonade
Directions
Add the vodka, blueberries and sugar to the bottom of the glass and use a spoon to muddle (or mash) everything, just until the sugar has dissolved and the blueberries are broken up. Add ice and lemonade, stirring to mix in the vodka-soaked blueberries.
This recipe from one of my quintessential favorite sources of Southern style and c’est si bon recipes, Southern Living.
Warm Gumbo Dip
Ingredients
¼ cup butter
6 green onions, sliced
2 celery ribs, diced
1 cup chopped assorted bell peppers
1 ½ pounds peeled, large raw shrimp, chopped
1 garlic clove, pressed
1 1/2 teaspoons Creole seasoning
1 (8-oz.) package cream cheese
3/4 cup sliced pickled okra
½ cup plus 2 Tbsp. grated Parmesan cheese
2 tablespoons chopped fresh flat-leaf parsley
Toasted French bread baguette slices
Directions
Preheat oven to 400°. Melt butter in a Dutch oven over medium heat; add green onions and next 2 ingredients. Cook, stirring occasionally, 6 to 8 minutes or until peppers are tender. Stir in shrimp and next 2 ingredients; cook, stirring occasionally, 2 minutes. Reduce heat to low; add cream cheese, stirring until cheese is melted. Remove from heat, and stir in okra and ½ cup Parmesan cheese. Spoon mixture into a 2-qt. baking dish, and sprinkle with remaining 2 Tbsp. cheese. Bake at 400° for 25 to 30 minutes or until bubbly and lightly browned. Sprinkle with parsley. Serve with bread.
Can be reheated at tailgating site in slow cooker or by placing the dip in a pan and warming it on the grill.
I invite you to visit The Farmgirl Cooks for more farm fresh delicious recipes.
Creole Sugar ‘N’ Spice Pecans
Add as much cayenne or other spicy chile powder as you like. Pure ancho or chipotle powder are especially good here.
Ingredients
1 egg white
⅓ cup sugar
2 T Creole seasoning purchased or make your own
10 oz pecan halves
Directions
Preheat oven to 300° and place a piece of parchment on a cookie sheet. Alternatively, use a silicone baking pan liner.*
In a medium bowl, whisk egg white until frothy. Whisk in sugar and creole seasoning. Using a spatula, stir in pecan halves, making sure to coat them evenly and completely.
Pour the nuts onto the parchment-lined baking sheet, ensuring they are in a single layer. There shouldn’t be much gooey eggy spicy liquid, but if there is, don’t scrape it all out of the bowl and onto the pan. It will just stick to the parchment and will make for more difficult nut removal.
Bake the nuts at 300° for 15 minutes. Give the nuts a stir – I used a large off-set spatula to do the dirty work – then reduce the oven to 250° and bake the nuts for another 10 minutes. Immediately give the nuts another stir to release them from the parchment.
Allow to cool and store in an airtight container (something with a padlock would have been helpful here) for as long as you can stand not eating them.
Creole Seasoning
Ingredients
1/3 cup paprika
3 tablespoons dried oregano
3 tablespoons ground black pepper
2 tablespoons dried basil
2 tablespoons kosher salt
1 tablespoons cayenne pepper
1 tablespoon granulated onion
4 teaspoons dried thyme
4 teaspoons granulated garlic
Directions
In a medium bowl combine paprika, dried oregano, ground black pepper, dried basil, kosher salt, cayenne pepper, granulated onion, dried thyme and granulated garlic. Stir to combine. Can be stored in an airtight container for up to three months.
-Places In The Home
Sweet Potato Cajun Fritters
Ingredients
4 to 5 sweet potatoes (about 3 ½ pounds)
2 large egg yolks
¼ pound tasso ham, finely chopped
7 ounces shredded sharp Cheddar cheese
2 teaspoons Cajun seasoning
1 ½ teaspoons kosher salt
½ teaspoon ground black pepper
2 cups pastry flour
3 large eggs, beaten
3 cups Japanese bread crumbs (panko)
Vegetable oil, for frying
Directions
Preheat oven to 400°. On a rimmed baking sheet, roast sweet potatoes until tender, about 1 hour. While sweet potatoes are still warm, peel and pass them through a food mill into a large bowl. Add egg yolks, tasso, cheese, Cajun seasoning, salt, and pepper. Using a spatula, gently combine.
Using a small ice cream scoop, scoop mixture onto a parchment-lined baking sheet. Prepare 3 shallow bowls of pastry flour, egg, and panko. Roll each sweet potato ball in flour, egg, and bread crumbs, and place on a parchment-lined baking sheet. Freeze overnight.
In a large Dutch oven, pour oil to a depth of 4 inches, and heat over medium-high heat until a deep-fry or candy thermometer reads 325°. Add sweet potato balls, in batches, and cook until golden brown, about 4 to 6 minutes. Drain on paper towels.
Serve with Creole mustard, if desired.
Blackberry-Bourbon Boston Butt
Ingredients
1 cup bourbon
1 cup blackberry jam, melted
¾ cup local honey
2 tablespoons ground black pepper
1 (8- to 10-pound) bone-in Boston butt pork shoulder
1 cup Cajun seasoning
1 cup firmly packed dark brown sugar
Pecan wood chips, soaked in water at least 30 minutes
Directions
In a medium bowl, whisk together bourbon, jam, honey, and pepper. Using a meat injector, inject bourbon mixture into pork on all sides, around the bone, and throughout the meat.
In a small bowl, combine Cajun seasoning and brown sugar. Liberally rub seasoning mixture on all sides of pork. Cover pork in plastic wrap, and refrigerate for 2 hours.
Preheat smoker to 225° to 250°. Sprinkle soaked wood chips over coals. Place pork, fat side up, in a disposable aluminum pan, and place in smoker. Cook, covered with lid, for 7 to 10 hours or until a meat thermometer inserted in thickest portion registers 190°.
Remove from heat, reserve pan drippings, and let stand for 30 minutes.
On bottom halves of muffuletta bread, layer half of salami, prosciutto, mortadella, soppressata, and provolone on each bread half. Top each with 2½ cups olive salad, add top half of the loaves; slice sandwiches into quarters, and serve.
Muffulettas may be made up to a few hours in advance. Cover, and refrigerate until serving.
Four Generation Olive Salad
Ingredients
1 anchovy fillet
2 tablespoons plus ¼ cup extra-virgin olive oil, divided
3 cups coarsely chopped cured green olives with pimiento
2 cups coarsely chopped black olives
1 cup finely diced celery
1 cup finely diced carrot
1 cup thinly sliced fennel
1 cup finely diced cauliflower (optional)
4 cloves garlic, minced
¼ cup capers, chopped
10 baby artichokes, boiled and quartered
1 thinly sliced lemon
¼ cup fresh oregano, chopped
1 tablespoon lemon juice (optional)
1 teaspoon ground black pepper (optional)
½ teaspoon salt (optional)
Directions
In a large bowl, combine anchovy and 2 tablespoons olive oil. Mash with a fork until combined. Add olives, celery, carrot, fennel, cauliflower, garlic, capers, artichokes, lemon, and oregano, stirring to combine. Add remaining 1/4 cup olive oil to just cover mixture, and stir well. Cover, and refrigerate 1 hour.
Taste mixture, and add lemon juice, salt, and pepper as needed. Serve.
I use a seeded Italian bread loaf from the bakery at Walmart.
When I have friends or family headed down NOLA way I request a jar (or 4) of one of these.
Don’t Forget the Flavor!
Who wants a Bloody Mary?
Now for Something Sweet
Aunt Sally’s Chewy Pralines
Instructions
When only the original will do, and no recipe I’ve tried quite captures that New Orleans sweetness, place an order for these original creole delights guaranteed to be a sweet hit.
Directions
Place your order online or by phoning Aunt Sally’s Original Creole Pralines direct at (800) 642-7257
Talk about easy!
Tailgating Season Food Safety Tips
Pack food in a well-insulated cooler with plenty of ice or icepacks. The temperature should be kept below 40º F.
A cooler placed in the back seat of an air-conditioned vehicle vs. a hot trunk will ensure cooler storage.
Keep hot foods hot and cold foods cold.
Two hours is the max time foods should be allowed to sit out.
If it is an exceptionally hot day or evening I would adjust the max time to one hour.
Our tailgating mantra is “chunk it” when the party is over.
Food poisoning is never a welcomed guest at any party.
Here’s wishing all you football fans a happy tailgating season!
Living the Good Life { Grandma Mary's Jezebel Sauce}
Edit: I'm adding this note to the original post which was originally published 12/20/13. Since then, I've shared this post a couple of times on the TGK fb page and it has been pinned on Pinterest so many times, I can't even believe it. Additonally, this post has been viewed about 7K times. I know Grandma would be thrilled beyond belief to be a "internet celebrity" no matter how minor.
I've been thinking about my Grandma a lot recently. I think it is because it is the holiday season and that was when she was in her element. She loved to entertain; she was famous for it. She and my grandfather, Po Po, held a beyond fabulous cocktail party every Christmas Eve. Everyone from the closest of friends to the most distant relative was invited and all would stop in for a drink at the bar and a sample of the foods from the sumptuous buffet.
As a child the anticipation of going there was immeasurable. I would dress in a one of a kind party dress made by my mother (a memorable one was floor-length plaid taffeta with an organza pinafore overlay); my impossibly long hair twisted into a bun on the top of my head or in the classic two-pony do. My siblings (older-than-I-stair-step-adolescents) would be dressed in some coordinated outfits (until they revolted against my mother). My glamorous mother would have her copper hair done up in some remarkable 70's do with tuxedo ruffled bodysuit blouse and floor-length velveteen skirt. My father, Honey, with his movie-star good looks would be in fabulous slacks and turtleneck (and in later years starched jeans and western shirt). Once dressed, we'd pile into the Cutlass Supreme and head across town with Christmas carols playing on the radio and the whole city ablaze with Christmas lights. We would arrive at my grandparents' house and be met by Grandma's flocked Christmas tree covered in red bows and jewel box birds in her front living room window. My grandfather, Po Po, would be holding court from behind the bar and ensuring that no one's glass was ever empty - especially his own.The sounds of laughter and music and merriment spilling out of the house and into the street.
Mama circa 1971 - Christmas Eve getting ready to head to the festivities
None of us, nor the lights of the entire city, could outshine the hostess. My grandmother exuded a joie de vivre that I covet - she never seemed to be stressed or under the gun, and always had a laugh and a smile on her lips. She was saucy and had a flamboyant elegance that could carry off the most dramatic of fashion choices: floor length velvet capes, a sheer jewel-toned peignoir over a solid silk gown, sequined tops with palazzo pants, and the shoes. Oh lord, the shoes. Always, always fabulous. This woman was not just a showpiece who hired everything done leaving her to flit around. She offered up quite a smorgasbord of items with no real rhyme or reason as modern party planning might require. She prepared every morsel herself as these were the days before one was able to buy a bag of pre-made meatballs or chicken wings at the local wholesale club store. Her most well-known items were Italian Meatballs, potato salad, pralines and pecan tarts. But, my particular favorite was the fried chicken drumettes. She would cut the wings and serve only that first joint that looks like a little drumstick. She saved the other two parts for chicken stock or some other preparation. The crispy crunchy coating was delicious and the diminutive size of the item made my child-mind wonder about what tiny chickens they must have been.
My Grandma (note the cocktail in hand) & I circa 1974 (Santa brought that Rub-a-Dub Dolly (Grandma handmade it an entire wardrobe of mix & match clothes.) I'm sure one of my brothers is being ridic out of frame hence my side glance and smirk) Also note - the sofa in the background. A great story goes with it, but this caption is already far too long. I am lucky to have that Hepplewhite sofa in my home today.)
Always on the table to go with that chicken and the ham as well, was a dish of one of my Grandmother's favorites and one of mine too. Until today when I was rifling through her recipe journals searching for things I can use at my own events this season, I had forgotten about it, but once I saw the name, Jezebel Sauce, this whole flood of memories were triggered and I went to researching the history of this sauce.
According to Ned Hemard in Remembering New Orleans History, Culture and Traditions. "One might find it odd that this sauce is named after a headstrong woman in the Old Testament who was thrown out of a window and consequently eaten by dogs. Jezebel, a Phoenician queen, was as an assertive woman vilified for thousands of years because she did not let men dominate her. It was for this trait that a popular 1938 American dramatic film was entitled Jezebel. Perhaps the sauce was named “Jezebel” for being (like the headstrong
New Orleans woman in the film) assertive, as well." While the earliest recipe in print for Jezebel Sauce was October 26, 1958, An earlier San Antonio Light article by Mary Lee Swan, May 21, 1939, mentions “Fruit Horseradish Sauce” but there is no description of the ingredients. In 1967 this recipe was featured in almost all the nation’s newspapers during the winter holidays. None of the articles offered a factual origin story.
Fruity and sweet with a punch from both mustard and horseradish and punctuated with black pepper, it truly is a perfect accompaniment for chicken and ham. Additionally, you'll find it in many a Southern home as an hors d'oeuvre poured over cream cheese and served with crackers. It is easy to make and seems much more ambitious than it truly is. A quick sauce to make, it requires no canning/processing as long as you keep it refrigerated. It would be a perfect homemade gift to spoon into small jars and give as a hostess gift, etc.
Grandma's Jezebel Sauce
1 18 oz jar apple jelly
1 18 oz jar pineapple preserves
2 Tbsp dried mustard powder
5 Tbsp prepared horseradish (yes, that's tablespoons - I wasn't kidding about this being assertive. If you prefer a less sharp flavor, cut this to 3 Tbsp)
~1 Tbsp cracked black pepper
Put all ingredients in a bowl; mix well. Spoon in to (a) jar(s) and refrigerate until use.
(This will make about 2 pints of sauce - which is enough for a little gift giving and saving some to go with your Christmas ham or to pour over that block of cream cheese!)
See? Simple.
What is so amazing about foods, and scents is how they have a special place in your memory bank and can elicit such a flood of emotions, hurtling you back in time and reminding you of the fabulous special people in your life and the fun times that you spent with them. My wish for you this holiday season is to create life-long memories with and for your family and friends. That's what I hope to do and will be sure to have some Jezebel Sauce in honor of my saucy Grandma to spice things up.
After weeks and weeks of agonizing and analyzing and debating and stressing and literally dreaming about it...I finally chose and ordered the laminate flooring for our new house. I had no idea it would be such a nerve wracking experience!
I knew in my head what I was looking for, something warm and rustic to bring that old farmhouse feel. I knew I definitely did NOT want something orange-y or 80's honey oak colored. I wanted something that was brown/tan, not orangeish or reddish. I also knew I definitely did NOT want anything shiny and smooth. I wanted texture and rusticness and something that looked realistic. Basically I wanted hardwood, but at a laminate price. : ) Let me tell ya, this is not that easy to find apparently. At least it wasn't for me, because I tend to be v.e.r.y. picky. Plus, our bank account made some immediate decisions for me on ones that were lovely but just too expensive.
You might remember this picture I shared a few weeks ago asking for everyone's opinions.
There was a big variety of opinions and each option had lots of people who loved it, though I think #4 probably took the lead. We ordered samples of these, but when they came they weren't what I was looking for. They had that waviness to them that some of the handscraped style laminates do, and that is something else I don't care for. Not really sure why that is, I just don't.
So...those were out.
Again, a wide variety of opinions were shared, some even said they didn't like any of them, lol!
Ultimately I decided the one on the far left, though beautiful and rustic, was just going to be too dark. The rooms where this will be laid don't get very much direct sunlight and I was afraid it would end up being too dark and suck the light right out of the room. Plus, everyone's comments that dark floors show every bit of dust and dirt kind of worried me. I don't like cleaning very much. For realz.
I also decided the one on the right had too much orange in it for my liking. So, I thought the middle one was looking like my only option, but even though I liked it I just wasn't completely sold on it.
Meanwhile, a friend of mine that I went to high school with posted a picture on her Facebook page of her kids playing on the floor in her house. Her kids are adorably cute, BUT...you guessed it...I noticed her floors. They were gorgeous! I immediately shot off a nosy message asking her what kind they were and what color. She told me the color (Historic Oak Charcoal) and said that they love their floors. They're beautiful and easy to clean and hardly show any dirt at all. Ummm...sold! I immediately started Googling. I found it and promptly fell in love. But what I also found was that it was way out of our price range. (They had gotten a great deal on theirs since they knew the owner of the flooring store in their town.)
I finally decided that I would just have to come to terms with the fact that I might not find the perfect one in our price range, and that I would just have to settle for something and learn to like it. I even prayed about. I told the Lord, "I know that this is such a tiny inconsequential thing in the grand scheme of things going on in this world, but this decision is pretty important to me right now so I'm asking that you'll please just help me to choose the right flooring that I can be happy with."
So...I continued the search. I visited a couple of local stores right here in our small town, but nothing was jumping out at me. I knew there was a flooring store about 40 minutes away, and they just so happened to carry my dream floors. I decided, "I've got nothing to lose, I'll just call them and see what kind of price they have on those floors. Never hurts to ask." Surprisingly, their price was not nearly as high as the other place I had checked! I began to feel a spark of hope. It was still more than we could afford, but it wasn't nearly as bad as I had originally thought. I remembered seeing this flooring on one of those discount flooring websites and decided to give them a call and do a price comparison. (All of this was while sitting in a CVS parking lot while my kids climbed like little monkeys all over the seats in the back of the van.) Turns out, they were having a Cyber Monday sale and their price was even lower, like ''we could afford that" lower. Woowhee! My heart was pounding! At this point I had only seen pictures of it, but had not looked at any samples in person. So we took off and drove the 40 minutes to the smaller store so that I could look at it in person and make sure that's really what I wanted before I placed any order.
And it was gorgeous, exactly what I had been looking for all along, and I fell in love all over again.
The people at The Floor Store were so nice and extremely helpful and knowledgeable. I told them about the sale from the discount flooring site, but said that I would much rather support a local small business than a huge online store and asked if they could do any better on their price. Not only did they do better, they actually beat the online store's sale price!! I could not believe it! I was so extremely happy and excited! I was amazed at the thought that God cares about the little things, and that He cares enough about lil' ol' me to not only answer my prayer but to give me the desire of my heart. He is amazingly awesome!
So, if you've made it this far then I'm sure you're dying to know what I ended up choosing, right?
Well, without further ado, here it is. (This cell phone picture doesn't do it justice!)
It's called Historic Oak Timber, and it's from the Restoration Collection made by Mannington (100% American made I might add!)
It is the perfect shade of brown I was looking for, no orange undertones there! It's rustic and it has texture and beveled edges, and and and.....I just love it! I cannot wait until it comes in and we can get it laid. It will go a long way in making a doublewide feel like an old farmhouse.
Not only am I excited about it, I'm also glad to have this decision behind me so that I can quit stressing over it and move on to other things to stress about. : )
***UPDATE 2 YEARS LATER***
I've received several questions from readers wondering how we ended up liking the Mannington floors so I decided to add an update. After 2 years of having these, with 3 young kids, a dog, and an indoor/outdoor cat, I can honestly say that we still LOVE them!! They've held up really well, we've had no major issues with them, and they almost always look clean! They hide dirt so well. The only minor issue we've had is that if something sharp or extra heavy has been dropped on them we've gotten the occasional small chip in the surface. I don't think they're a big deal though. I just simply color in the chipped area with a brown Sharpie marker and it blends right in with the worn character of the laminate. The beveled edges do tend to catch crumbs, but it's nothing a quick vacuum can't handle. I would definitely recommend these floors if you're considering them. In fact, I hope to get them installed in our living room and piano room someday soon!
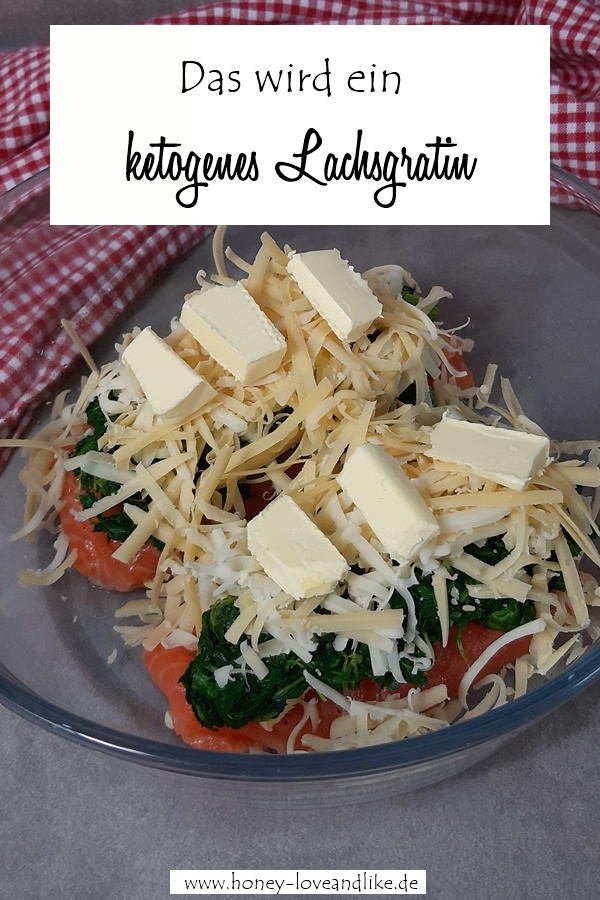
Ketogenes Lowcarb Lachsgratin mit Blattspinat und viel Käse
Manchmal kann man seine eigenen Fotos nicht mehr sehen. Da hilft nur: neu kochen und neu fotografieren. Heute gibt es einen Uralt-Artikel aus 2015 von mir, neu aufpoliert. Und ich sage dir, dass musst du nachkochen, denn es ist so mega lecker! Ein absolut schnelles ketogenes Gericht ist mein Lowcarb Lachsgratin. Auch wer nicht gerne kocht, bekommt das hin, denn man braucht nur 4 Zutaten: Lachsfilet, Blattspinat, Butter, Käse und wenn man will Gewürze.
So machst du das beste ketogene Lowcarb Lachsgratin
Vorab: Kennst du schon meine neue Food-Seite Keto.Liebe auf Instagram?
Nein, noch nicht? Dann würde ich mich freuen, wenn du mir dort folgst. Ich teile dort leckere Keto und Lowcarb Rezepte, viele Bomben und Hackrezepte, Nährwerte, Makros, Tagespläne und vieles mehr. Wenn du hier klickst, dann kommst du direkt zu meinem Profil Keto.Liebe. Ich freu mich auf dich!
Lowcarb Lachsgratin – Was braucht man?
Ich nehme hierfür eingefrorenen Lachs und lasse diesen bei Raumtemperatur auftauen. Genauso wie den Blattspinat. Obwohl ich auch gerne gelegentlich frischen Blattspinat kaufe und blanchiere. Aber heute habe ich mir diese Arbeit nicht gemacht und zum Gefrierschrank gegriffen.
Zutaten für 2 Personen:
2 x Lachsfilet (2x125g)
400 g Blattspinat
50 g Butter
200 g Käse
Salz & Pfeffer
Zubereitung:
Spinat und den Lachs aus dem Gefrierschrank nehmen und auftauen lassen.
Spinat auswringen.
Lachs waschen und mit Salz und Pfeffer bestreuen.
Danach mit der Hälfte der Butter belegen.
Den Spinat verteilen.
Mit Käse bestreuen.
Den Rest Butter darauf verteilen.
Für 20-22 Minuten bei 180 Grad backen.
So machst du das beste ketogene Lowcarb Lachsgratin So machst du das beste ketogene Lowcarb Lachsgratin So machst du das beste ketogene Lowcarb Lachsgratin So machst du das beste ketogene Lowcarb Lachsgratin So machst du das beste ketogene Lowcarb Lachsgratin So machst du das beste ketogene Lowcarb Lachsgratin So machst du das beste ketogene Lowcarb Lachsgratin So machst du das beste ketogene Lowcarb Lachsgratin So machst du das beste ketogene Lowcarb Lachsgratin
Tipps und Tricks für deine Keto Ernährung
Reibe deinen Käse immer selber!
Warum? Weil industriell verarbeiteter Käse immer Zusatzstoffe und Kohlenhydrate enthält. Es sind zwar nicht viele KH, aber so 2g auf 100g sind es schon. Das muss nicht sein!
Ich habe bei diesem Lachsgratin zwei verschiedene Sorten gewählt. Einmal Emmentaler und einmal Old Amsterdam. Einen milden und einen kräftigen Käse. Du kannst aber auch jeden anderen Käse nehmen.
So machst du das beste ketogene Lowcarb Lachsgratin
Gefällt dir mein Lowcarb Lachsgratin?
Ich finde, es entsteht ein unkompliziertes schnelles ketogenes Gericht mit super Nährwerten. Spinat hat 1g Kohlenhydrate und der Lachs, der Käse und die Butter haben 0g Kohlenhydrate auf 100g. Und dank des Fettes werdet ihr satt!
Die Nährwerte für eine Person:
1 g KH
50 g Fett
41 g EW
608 kcal
Anstatt Butter kannst du auch Sahne nehmen. Oder du machst deine Sahne selber
Wenn ihr allerdings Kohlenhydrate sparen wollt, dann gebe ich euch den Tipp vorher eure eigene Sahne aus Butter, selber zu machen.
This Instant Pot Sesame Chicken recipe is better than take-out with a sticky-sweet sauce and a little kick that envelopes tender pieces of chicken!
My husband grew up in the Bay Area. He knows what good Asian food should taste like, so his standards are high. I had resolved never to make Asian food because his criticism wasn’t worth it.
Then I had success with Instant Pot Pho, and he praised it, giving feedback to perfect it. My confidence was high, so one night I made Instant Pot Pork Fried Rice with this Instant Pot Sesame Chicken. I’m certain he said he loved me at least twice during the meal!
You may also want to check out my Pinterest Instant Pot board for more great recipes like this pressure cooker Sesame Chicken!
colage of instant pot sesame chicken on plate, in chopsticks and closeup
We love it served with freshly steamed rice or with a side of broccoli, or even the broccoli mixed in.
It’s a delicious meal you’ll want to add to your rotation.
If you aren’t wanting the additional sodium, try using reduced-sodium soy sauce.
Instant pot Chinese sesame chicken with chopsticks
Serves 4
Prep Time: 5 minutes
Function and Time: Manual or Pressure Cook 3-minutes, saute 5-minutes
Cook Time: 3 minutes
Release Method + Time: Quick Release
Total Time: 26 minutes
iEasy Instant Pot Honey Sesame Chicken
Instant Pot Sesame Seed Chicken Ingredients:
1 pound chicken tenders, cut into 1-inch pieces
1 Tablespoon Oil
2 Tbsp. cornstarch, divided
2 cloves garlic, minced
1 Tbsp. Sesame Oil
1/2 cup soy sauce, low-sodium
1/4 cup ketchup
1/2 cup honey
2 Tbsp. water
2 Tsp. sesame seeds
1/4 tsp. red pepper flakes, optional
green onions, chopped, for garnish
Instant Pot Sesame Seed Chicken Directions:
Prepare the Instant Pot.
Press saute and add the vegetable oil to the Instant Pot.
In a small bowl, add 1 Tablespoon of the cornstarch.
Toss chicken pieces into the cornstarch until chicken is coated evenly.
Press Saute.
Add chicken and the garlic to Instant Pot and allow to cook in the oil for 4 minutes, or until golden brown.
Prepare the sauce.
In a small mixing bowl combine the soy sauce, ketchup, and red pepper flakes and stir until well combined.
Pour this sauce over the chicken in the Instant Pot.
Lock Lid and Set Time.
Lock the lid in place and turn the valve to the “sealing” position and press Manual or Pressure Cook.
Set the timer for 3-minutes.
Quick Release.
When the timer beeps, Quick Release.
Add Honey and Oil.
Open the lid once the pressure has been released and stir in the sesame oil and the honey.
Stir quickly to combine.
Thicken the Sauce.
Press Saute on the Instant Pot.
In a small bowl, whisk the remaining 1 Tbsp Cornstarch into 3 Tablespoons cold water until it is smooth.
Stir this cornstarch and water into the chicken, constantly stirring for 2 minutes or until sauce reaches the desired consistency.
Serve.
Remove chicken from Instant Pot and sprinkle with sesame seeds.
Serve alone, or over rice or noodles; we recommend this pork fried rice.
Garnish with green onions.
If you don’t have an Instant Pot, you can still partake. Try the Conventional method:
Mix up the sauce, cut up the chicken, and sear it quickly in the oil over medium heat.
Add the sauce.
Bring to a boil.
Lower the heat to low and simmer, covered for 5 minutes.
Mix the water and cornstarch and add to the sauce, stirring until incorporated and continue to simmer until thickened.
Instant Pot Sesame Seed Chicken Tips:
This recipe moves quickly.
Have every prepped before starting the recipe.
The longer you cook the mixture at the end during the saute setting, the thicker the sauce will be. Do NOT leave the pot unattended.
The Instant Pot® College Cookbook is the definitive dorm room solution for easy, homemade meals.
Cereal and pizza might be enough to sustain a crash study session, but the best brain food is a homemade meal.
The Instant Pot® College Cookbook saves college students from four years of nutrient deprivation with quick and easy, budget-friendly meals.
From grab-n-go Breakfast Burritos to late-night Macaroni and Cheese, this college cookbook contains 75 tasty meals that require no previous cooking or Instant Pot® experience to whip up.
Using easy-to-find and affordable ingredients, The Instant Pot® College Cookbook saves students time and money too with good fast food that rivals any take-out menu.
The Instant Pot® College Cookbook includes:
• Instant Pot® cooking 101 that explains pressure cooker settings for every type of food, tips, and FAQ.
• 75 home-style meals that include breakfast, everyday staples, soups and stews, meatless meals, poultry, pork and beef, dessert, and more!
• Fool-proof recipes that combine quick prep times with easy-to-find and affordable ingredients to suit student schedules and wallets.
Save ramen for emergencies with quick and easy recipes from The Instant Pot® College Cookbook.
Including this great Instant Pot Sesame Seed Chicken.
Her writing has appeared on The Huffington Post, Scary Mommy, Pop Sugar, SheKnows, Yahoo Shine, Love What Matters, Ellen Nation, and her recipes have been featured on Bon Appetite, SparkPeople, and The Huffington Post.


#/media/File:A_Home_on_the_Mississippi.png)